This is the second part of a tutorial that provides instructions for how to create an authentication mechanism for a web application utilizing Flask as the Python web framework and Elasticsearch (ES) as the NoSQL data store.
The first part of the tutorial covered the prerequisites, the Main API, the User model, and the Users API end point. In this second part of the tutorial, I will be covering the Flask-Login and session management modifications required for the main API, the User model, and the Auth API.
Once again, feel free to ask any questions below and I’ll be happy to respond!
Flask-Login
Flask-Login provides user session management for basic authentication tasks; logging a user in and logging out a user, in your application. You can restrict specific views for non-authenticated users by adding a decorator to your view routes. For this tutorial example, I have followed the basic configuration and created a custom user_loader for ES.
Main API
In the Main API, we define the ‘login_manager’ and the ‘load_user’ function for the Flask-Login ‘user_loader’ decorator which sets the callback for reloading a user from the session. The ‘load_user’ funcation creates a User object, checks if the user exists in ES, then returns the User object:
defis_authenticated(self): """ should just return True unless the object represents a user that should not be allowed to authenticate for some reason. """ if self.is_anonymous(): returnFalse returnTrue
defis_active(self): """ method should return True for users unless they are inactive, for example because they have been banned. """ ifnot self.values.get('is_active', False): returnFalse returnTrue
defis_anonymous(self): """ method should return True only for fake users that are not supposed to log in to the system. """ ifnot self.values.get('is_anonymous', False): returnFalse returnTrue
defget_id(self): """ return the self.key """ return self.values[KEY_NAME]
Auth API
Now for the Auth API, we create a ‘login’ route for authenticating a user and a ‘logout’ for unauthenticating a user. For the ‘login’ route, first, we verify the user submitting the request is valid by checking if the user key exists in ES. Next, we check if the request payload includes the correct password by comparing the password value with the hashed password from the database. Finally, we add the valid user into session via ‘login_user’. The ‘login’ route is almost identical to the ‘new’ user route from the User API, but we add the password check and add the authenticated user via ‘login_user’:
...
    logger.debug("'%s' successfully found!", request.json['email_address'])
    user.set_values(values=data['_source'])
    if not user.check_password(request.json['password']):
        logger.warn("'%s' incorrect password", request.json['email_address'])
        message = "Unknown email_address or bad password"
        return jsonify(message=message, success=False), 400
    login_user(user)
    message = "'%s' successfully logged in!" % request.json['email_address']
    logger.info(message)
...
```

Once a use is authenticated, the active user is now stored in the session. For the 'logout' route, we simply call the 'logout_user()' method to remove the user id from the current session. Now let's create a test route that is only accessible from authorized users.

## Test API

The [Test API](https://github.com/phriscage/flask_elasticsearch_auth_example/blob/master/lib/example/v1/api/test/views.py) includes the 'login_required' decorator which restricts access to only users that are authenticated:

``` Python Test https://github.com/phriscage/flask_elasticsearch_auth_example/blob/master/lib/example/v1/api/test/views.py
...
@test.route('')
@login_required
def index():
...
Import the new auth and test Blueprints and register it with the URL route to the app in main.py:
from example.v1.api.auth.views import auth app.register_blueprint(auth, url_prefix="/v1/auth") from example.v1.api.users.views import users app.register_blueprint(users, url_prefix="/v1/users") from example.v1.api.test.views import test app.register_blueprint(test, url_prefix="/v1/test")
Start the application again with the ‘main.py’ and run curl -X GET -D - http://127.0.0.1:8000/v1/test. You should recieve an 401 unauthorized response:
1
$ curl -X GET -D - http://127.0.0.1:8000/v1/test
HTTP/1.0 401 UNAUTHORIZED
Content-Type: application/json
Content-Length: 294
Set-Cookie: session=eyJfaWQiOnsiIGIiOiJOalk0TldVMU1XWXdaamsyT0Roa1pqVmxOamN3TnpRNU5tSmpNamsxTVRJPSJ9fQ.B6pYAg.q2HbuYgeleBAGU1kKfDCCnGEugg; HttpOnly; Path=/
Server: Werkzeug/0.9.6 Python/2.6.6
Date: Tue, 20 Jan 2015 01:18:19 GMT
{
"error": "401: Unauthorized",
"message": "The server could not verify that you are authorized to access the URL requested. You either supplied the wrong credentials (e.g. a bad password), or your browser doesn't understand how to supply the credentials required.",
"success": false
}
We need to first authenticate our test user, store the cookie, then send the request again. Let’s authenticate the user we created in Part I, ‘test@abc.com’ and store the cookies into a file, ‘cookies.txt’
Boom! We’ve successfully authenitcated our test user! You can view the ‘cookies.txt’ to see the current session cookie. Now we can use that session variable to send a request to ‘test’ again: curl -X GET -s -D - -b ~/cookies.txt http://127.0.0.1:8000/v1/test
That’s it! There’s not alot too it. You can use the ‘login_required’ decorator on any view that requires authentication. There are some session expiration configuration options and custom authentication params that are confgiurable in Flask-Login.
I hope you have found this tutorial helpful and maybe even learned a thing or two about Python, Flask, authentication, etc. Let me know if you have any questions.
This tutorial provides instructions for how to create an authentication mechanism for a web application utilizing Flask as the Python web framework and Elasticsearch (ES) as the NoSQL data store. Many applications utilize ES as the index/search layer, but I choose ES as the primary database as a proof of concept for both persistant and search data layers. ES can be swapped out with almost any available NoSQL document store.
A basic understanding of the *NIX system, Python, and web applications is required otherwise you may struggle with some of the concepts and context. If you are new to Flask, I highly recommend checking out Miguel Grinberg’s Flask Mega Tutorial or his newley published Flask Book by O’Reilly for a complete Flask application how-to. The User Login tutorial actually inspired me to build this tutorial for a NoSQL data store.
In this first part of the tutorial, I will be covering the prerequisites, the main API, the User model, and the Users API end point. If you have any questions, feel free to write below and I’ll be happy to answer if you have any issues.
Let’s get started!
Prerequisites
Below are the specific prerequisites that are required to setup the working environment and download the neccesary packages and files.
linux server: This tutorial is based off the Centos 6.4 x86_64 base image, so package management (and command instructions below) are via RPM and Yum. sudo or root privileges are required to install the various system packages. If you prefer Debian, you’ll need to substitute the respectable DEB packages and apt-get commands.
ssh username@hostname
Elasticsearch: The ES server package is downloaded directly from the ES site. Installation and the default configuration is all that is required to get the service running. You can verify ES is running by executing curl -X GET http://127.0.0.1:9200 or navigating to the URL. note that version 1.3.2 is used at the time of writing
Python: Python 2.6.6 is already included in the base Centos 6.4, so that version will work. We’ll be using Python virtual environments and Pip to handle the Python libraries and dependencies:
Now we should have all the required dependencies. :)
Main API
Before we create the primary User model, we need to create the basic Flask app API and verify we can connect to ES. I’m using Flask’s global g module to handle the ES client connection for each request. You can tweak the ES connection pool options for the cluster, but for now the default connection object works. I am using the default_error_handle method to return a standard JSON formatted message for all of the relevant HTTP error codes.
defconnect_db(): """ connect to couchbase """ try: db_client = Elasticsearch() #[{'host': ELASTICSEARCH_HOST, 'port': ELASTICSEARCH_PORT}], #use_ssl=True,) #sniff_on_connection_fail=True,) except Exception as error: logger.critical(error) raise return db_client defcreate_app(): """ dynamically create the app """ app = Flask(__name__) app.config.from_object(__name__) @app.before_request defbefore_request(): """ create the db_client global if it does not exist """ ifnot hasattr(g, 'db_client'): g.db_client = connect_db() defdefault_error_handle(error=None): """ create a default json error handle """ return jsonify(error=str(error), message=error.description, success=False), error.code ## handle all errors with json output for error in range(400, 420) + range(500, 506): app.error_handler_spec[None][error] = default_error_handle
The main.py arguments accept a specific hostname or IP and port number. When you start the application, the output should look like this:
1
$ ./main.py
2014-12-06 22:10:05,770 INFO werkzeug[8640] : _log : * Running on http://0.0.0.0:8000/
2014-12-06 22:10:05,770 INFO werkzeug[8640] : _log : * Restarting with reloader
We can verify it works, along with the default_error_handle, but pulling the base URL. curl -X GET -D - http://127.0.0.1:8000/
1
$ curl -X GET -D - http://127.0.0.1:8000/
HTTP/1.0 404 NOT FOUND
Content-Type: application/json
Content-Length: 191
Server: Werkzeug/0.9.6 Python/2.6.6
Date: Sun, 07 Dec 2014 00:35:23 GMT
{
"error": "404: Not Found",
"message": "The requested URL was not found on the server. If you entered the URL manually please check your spelling and try again.",
"success": false
}
Great! Now let’s define our User model and how-to store the user document data in ES.
User model
The User model contains the data structure and validation methods for the user metadata that will be passed from the API.
First, we include the system level modules and two password hash functions from werkzeug. We define what the key or ID attribute name will be for our user document and any additional required and/or valid attributes for the document.
Instatiation of class executes private class functions to validate the kwargs against the global VALID_AGRS and REQUIRED_ARGS. It also sets the default and required values for the user document:
classUser(object): """ encapsulate the user as an object """ def__init__(self, **kwargs): """ instantiate the class """ self.key = None self.values = {} self._validate_args(**kwargs) self._set_key(kwargs[KEY_NAME]) self._set_values()
The set_password and check_password functions are how the model generates a password hash and verifies a plain text password against a hash. Instead of creating our own hashing algorithms, we use werkzeug’s utilies we imported above:
defset_password(self, password): """ set the password using werkzeug generate_password_hash """ self.values['password'] = generate_password_hash(password) defcheck_password(self, password): """ check the password using werkzeug check_password_hash """ ifnot self.values.get('password', None): returnNone return check_password_hash(self.values['password'], password)
There’s not alot going on the User model for Part I, but we will expand the functionality in the next tutorial.
Users API:
Now that we have our basic user model, let’s define the User API endpoint that enables us to create a new user in ES. I’m using Flask’s Blueprint, jsonify, request and g modules. I created a ‘users’ Blueprint and added the root ‘/new’ route to create new users via HTTP POST. REST API Tutorial provides a greate “resource” for learning the appropriate synatx naming. For a truely textbook RESTful interface, one can argue between how a new resource is created ( ‘/users/new’, ‘/user/new’, or ‘/users’) and if resource pluralization matters, but I’ll save that discussion for a later date…
The overall logic is straightforward. First we verify the request content type is ‘application/json’. Next we create the User model and check the payload. Then check if the User document exits in ES. Finally, create a new User document if the User key, email_address, does not exist in ES.
import os import sys sys.path.insert(0, os.path.dirname(os.path.realpath(__file__)) + '/../../../../../lib') from example.v1.lib.user import User, KEY_NAME as USER_KEY_NAME from flask import Blueprint, jsonify, request, g from elasticsearch import TransportError import logging
logger = logging.getLogger(__name__)
users = Blueprint('users', __name__)
@users.route('/new', methods=['POST']) """ create a user and hash their password
from example.v1.api.users.views import users app.register_blueprint(users, url_prefix="/v1/users")
If your ‘main.py’ file is not running, restart it. Finally, let’s test creating a new user ‘test@abc.com’ against the Users API with the curl -X POST -H 'Content-Type: application/json' -d '{"email_address": "test@abc.com", "password": "test"}' http://127.0.0.1:8000/v1/users/new
When I was invloved with the Invid.io team from 2012-2014, one of the initial proof of concept projects I created was an application that provides video product metadata and merchant retailers directly to consumers. The Inspired app (source), enabled the content creators the ability to organize and sell their products to an audience. In this post, I’m going to provide an overview of the technologies utilized for the application at a high-level and a few specific examples.
Most of the Python web applications I had built previously were using the Django web framework. Since Inspired did not require all of the compents and functionality that Django provided out of the box, I decided to try Flask for the project. I had created a few stand-alone APIs using Flask in my full-time position, but not a full-blown application.
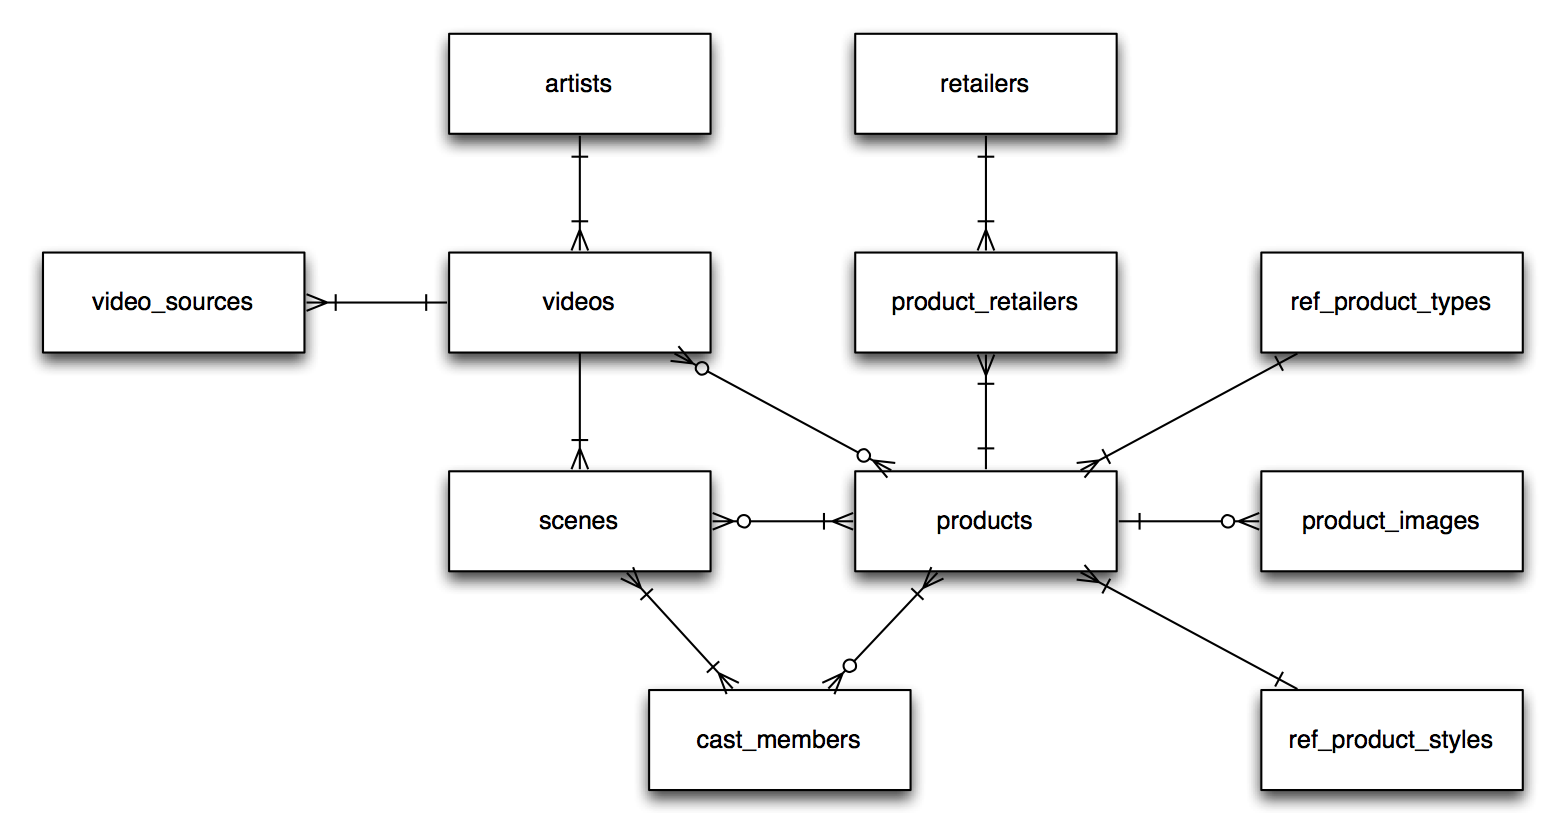
Data model
Inspired was designed with a high-level relational data model of Artists -> Videos -> Products -> Retailers. The complete Inspired ERD is below:
I was initially tempted to use a NoSQL data store like Cassandra to handle the horizontal scaling in the future, but at the time, I had minimal experience with denormalizing and duplicating the data to fit the specific queries for the user interface. I decided to go with the de facto standard relational data store, MySQL. Instead of creating standard raw SQL queries, I used an ORM plugin SQLAlchemy to build the queries and model relationships. SQLAlchemy provides some create documentation on how to build the model classes and their respectable releationships. Here’s an example of how the Video model uses both One-to-Many and Many-to-Many relationships in it’s class:
classVideo(Base): """ video_products join_table used to defined the bi-directional relationship between Video and Product. Creating a separate class is overkill unless additional atributes are required. """ video_products = Table('video_products', Base.metadata, Column('video_id', Integer(unsigned=True), ForeignKey('videos.video_id', name='fk_video_products_video_id', ondelete="CASCADE"), index=True, nullable=False), Column('product_id', Integer(unsigned=True), ForeignKey('products.product_id', name='fk_video_products_product_id', ondelete="CASCADE"), index=True, nullable=False), mysql_engine='InnoDB', mysql_charset='utf8' )
classVideo(Base): """ Attributes for the Video model. Custom MapperExtension declarative for before insert and update methods. The migrate.versioning api does not handle sqlalchemy.dialects.mysql for custom column attributes. I.E. INTEGER(unsigned=True), so they need to be modified manually. """ __tablename__ = 'videos' __table_args__ = { 'mysql_engine': 'InnoDB', 'mysql_charset': 'utf8' } ## mapper extension declarative for before insert and before update __mapper_args__ = { 'extension': BaseExtension() }
When I was building the data models, I wanted to use a similar DJango function for auto updating the DateTime fields whenever the row was created/updated auto_now. SQLAlchemy 0.7.8 did not have this ability, but you could create custom extensions for the SQLAlchemy model through the mapper_args. I was able to implement the auto_now by extending the MapperExtension:
classBaseExtension(MapperExtension): """Base entension class for all entity """
defbefore_insert(self, mapper, connection, instance): """ set the created_at """ datetime_now = datetime.datetime.now() instance.created_at = datetime_now ifnot instance.updated_at: instance.updated_at = datetime_now
defbefore_update(self, mapper, connection, instance): """ set the updated_at """ instance.updated_at = datetime.datetime.now()
Schema Migrations
I was familiar with Ruby on Rails schema migrations and used a snippet of the Rails migration functionality extensively for Django (South was not mature yet). I decided to give Alembic a try since it has the ability to auto-generate the migrations based off the SQLAlchemy models. There were some gotchas with the 0.6.0 release, but overall, I think it is comparable to Rails migrations. I.E.
explicitly importing sqlalchemy.dialects.mysql.INTEGER for unsigned values
version filename length had fixed limit
I was also able to seed some initial test data (outside unit testing) in a few migrations.
Unit testing
I used Python’s unittest library to test both the SQLAlchemy models and Flask API end points. For each model and API test case class, I duplicated the MySQL schema and ran the migrations to ensure a clean environment. The nosetest performance was not great, but utilizing MySQL over SQLlite provided a more production like environment for test simulation.
unittest
1
2
3
4
5
6
$ nosetests -s -x ........................................................................... ---------------------------------------------------------------------- Ran 75 tests in5.823s
OK
Feel free to check out the source and let me know if you have any questions.